
How to Create Google Search Ads for Contractors (Step-by-Step)
Published on
11/15/2025
Published by
Terry Robinson

Contents
You're tired of waiting for the phone to ring. Referrals are great—until they dry up. And when you finally try Google Ads, the setup process feels like it was designed to confuse you.
The good news?
Once you know which settings actually matter for a service business, the setup process gets a lot simpler. This guide walks you through how to create a Google Search Ads campaign built specifically for contractors—step by step, with the settings that drive real leads instead of wasted clicks.
Setting Up Your Google Ads Account
Before you build your first campaign, you'll need a Google Ads account.
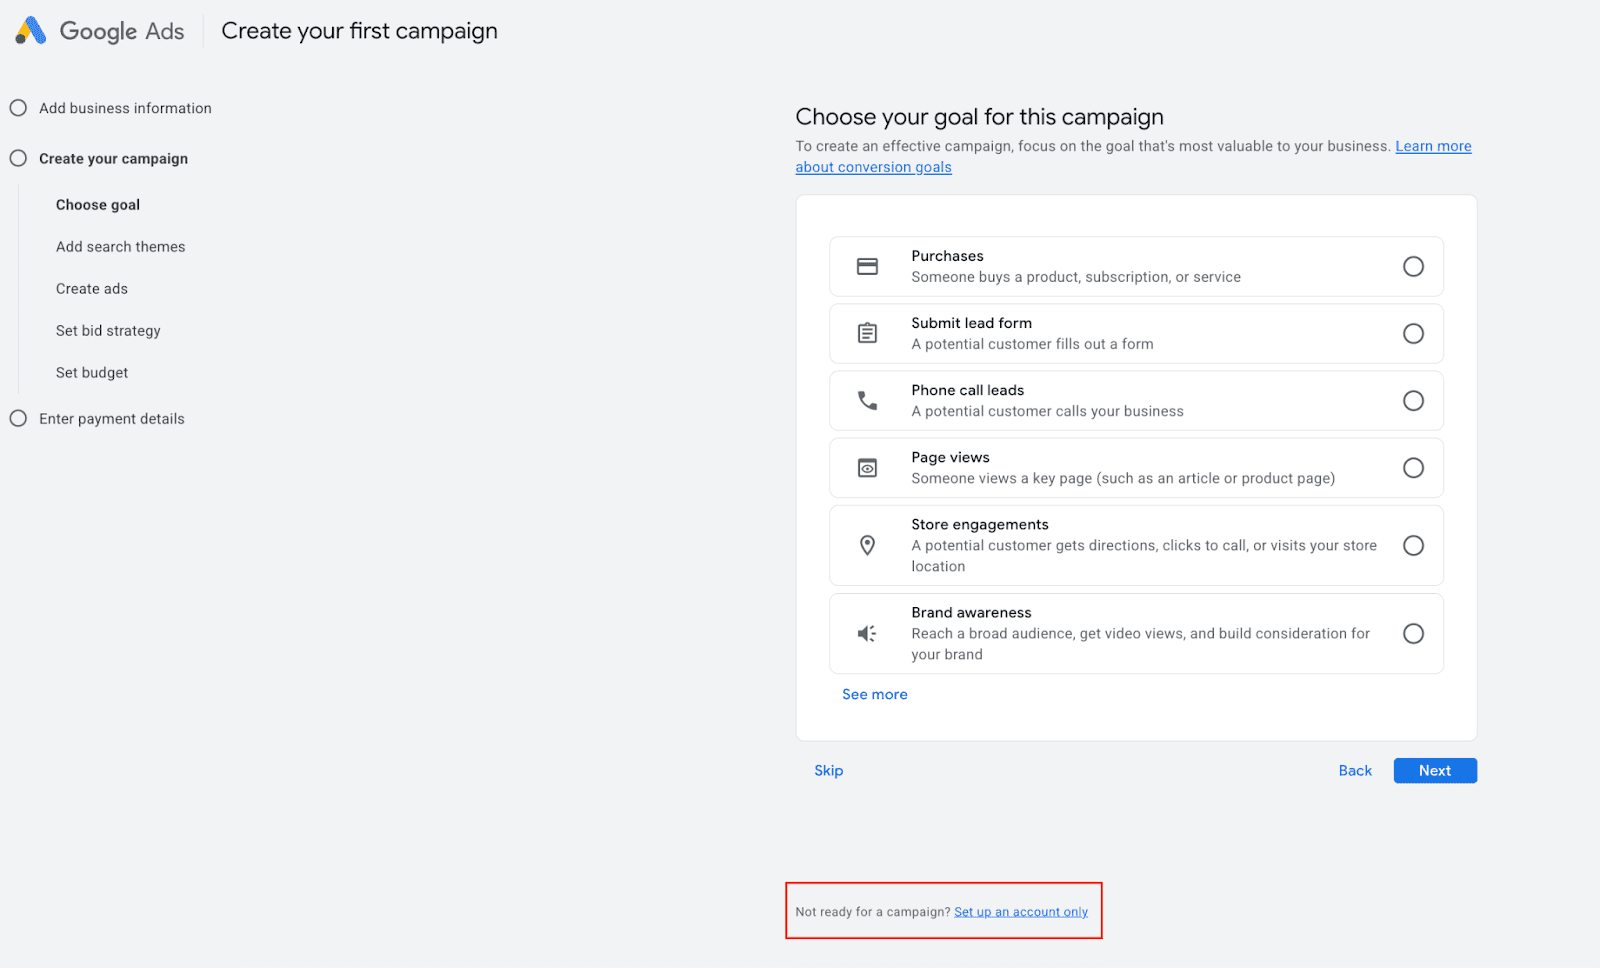
If you have never setup an account before, you will start by going to ads.google.com and click "Start Now." Google will begin trying to setup a smart campaign. This may seem compelling for those who are not familiar with the platform, but taking time to build your own custom campaign could save you more money and will be more effective.
So instead of following Google’s prompt “Choose your goal for this campaign”, towards the bottom select the option “Set up an account only”. Once your in your new account (you may need to setup payment method first), then you should be ready to rock and roll.
Understanding Campaign Structure
Before diving into the setup, it helps to understand how Google Ads is organized.
Think of it like a filing cabinet:
Campaign = The top-level folder. This is where you set your budget, targeting, and bidding strategy.
Ad Groups = Folders inside the campaign. Each ad group holds a set of related keywords and ads.
Ads = The actual ads people see when they search.
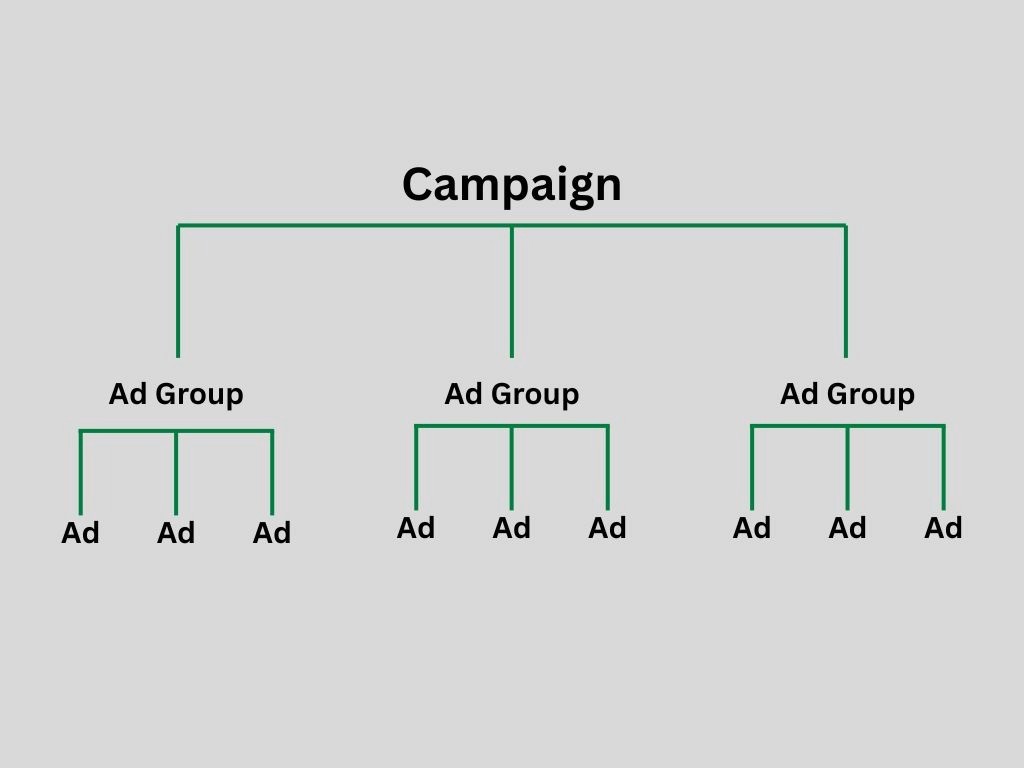
Why does this matter for contractors?
Say if you are a garage door company that offers multiple services—say, garage door installation, garage door repair, and gate installations—you'd create separate ad groups for each. That way, someone searching "garage door repair" sees an ad about garage door repair, not a generic ad about your company.
This structure keeps your campaigns organized and your ads relevant.
Before You Start
Campaign setup isn't the time to figure out your strategy. Before you click "New Campaign," get clear on two things:
1. Know your goal.
What do you actually want from this campaign? Phone calls? Form submissions? Both?
Does not really matter but you certainly need to know what you want to get out of the campaign or else you could find yourself overwhelmed and scattered all over the place.
2. Have your keywords ready.
You'll need a list of keywords you want your ads to show up for. If you haven't done keyword research yet, pause here and knock that out first.
For contractors, the money is in "service + location" keywords. Think: "roof repair Dallas," "HVAC contractor near me," "licensed electrician Austin."
Creating Your Search Campaign (Step-by-Step)
Now we are getting to the good stuff. Let's walk through each step of building your Google Search Ads campaigns
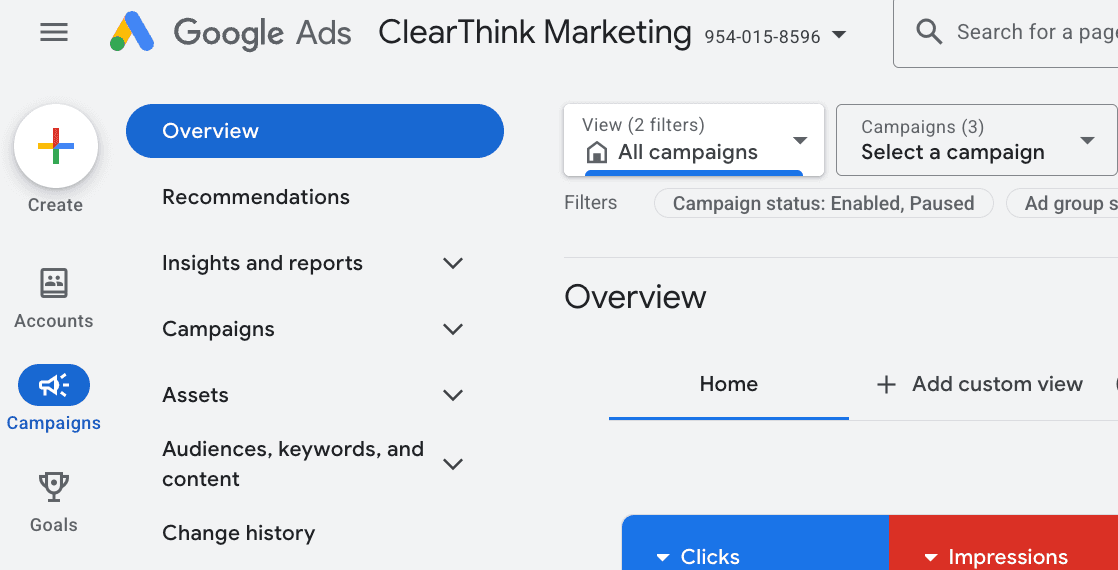
Start in Your Dashboard
Log in to your Google Ads account here. After that, your Google Ads dashboard should show up. On the Overview screen, click the "+ Create" button and then select campaign
Create Your Campaign
When it comes to Google Ads, how you setup the campaign level will impact it’s performance beyond just the objective.
Let’s get going.
Choose Your Objective
So in the first step of this process Google will ask you what your specific goal you want to accomplish.
Each objective tells Google how to optimize your ads, what audiences to prioritize, and what outcomes matter most.
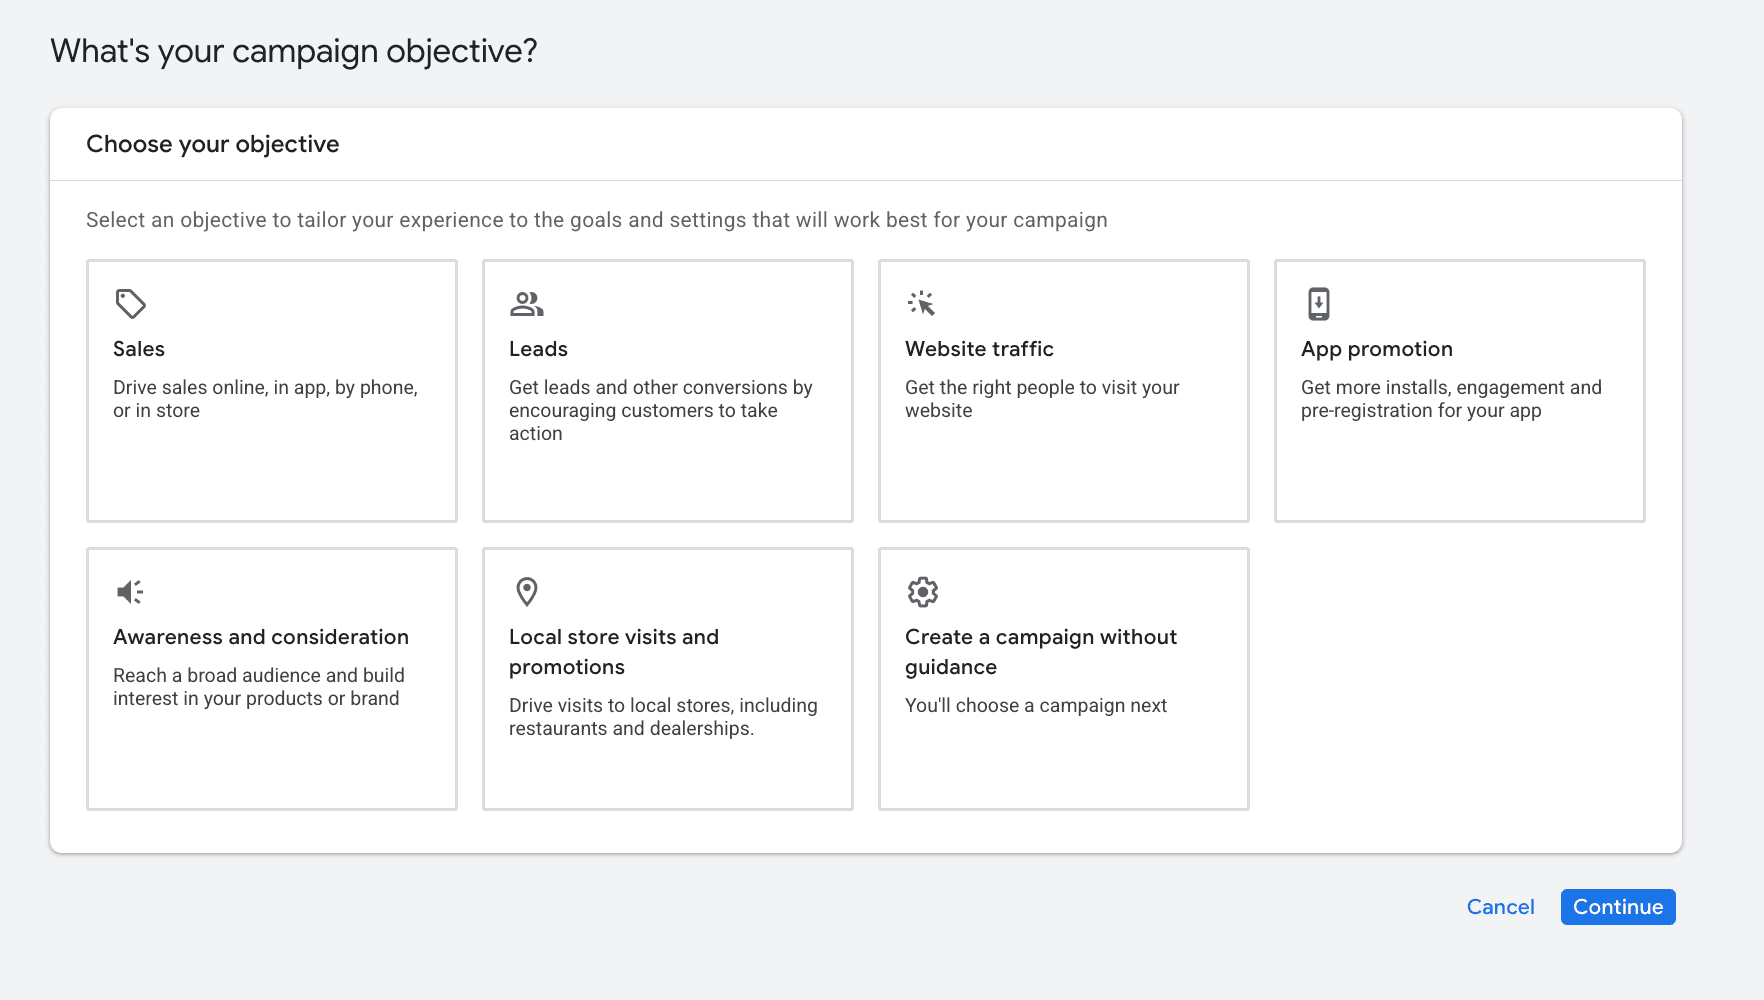
Let’s break down the options:
Sales – Drives direct purchases or service bookings online, by phone, or in-store. Best for businesses that can track and optimize around actual revenue actions.
Leads – Focuses on generating form submissions, calls, or quote requests. Ideal for service-based or B2B companies that rely on lead generation rather than instant sales.
Website Traffic – Sends more qualified visitors to your site. Useful for awareness, warming up audiences, or when conversion tracking isn't fully set up yet.
Awareness and Consideration – Reaches a broad audience to build interest and get people to explore what you offer. Best when visibility is the primary goal.
Brand Awareness and Reach – Prioritizes impressions and name recognition. Great for new businesses, rebrands, or expanding into new geographic markets.
App Promotion – Drives app installs, pre-registrations, or in-app engagement. Designed specifically for businesses promoting a mobile app.
Local Store Visits and Promotions – Encourages people nearby to visit your physical location. Ideal for retail, showrooms, or service providers with a brick-and-mortar presence.
There is also the option of “Create a Campaign Without Guidance,” but we don’t recommend this for contractors who are new to Google Ads.
In most cases for contractors, we will always recommend setting leads as your objective. Google will take note of this and optimize your campaign for generating leads.
Select a Conversion Goal
Next, you'll choose which actions count as conversions. For contractors, the most valuable options are:
Phone calls (from the ad or your website)
Form submissions (quote requests, contact forms)
Check the boxes that match how you want leads to come in.
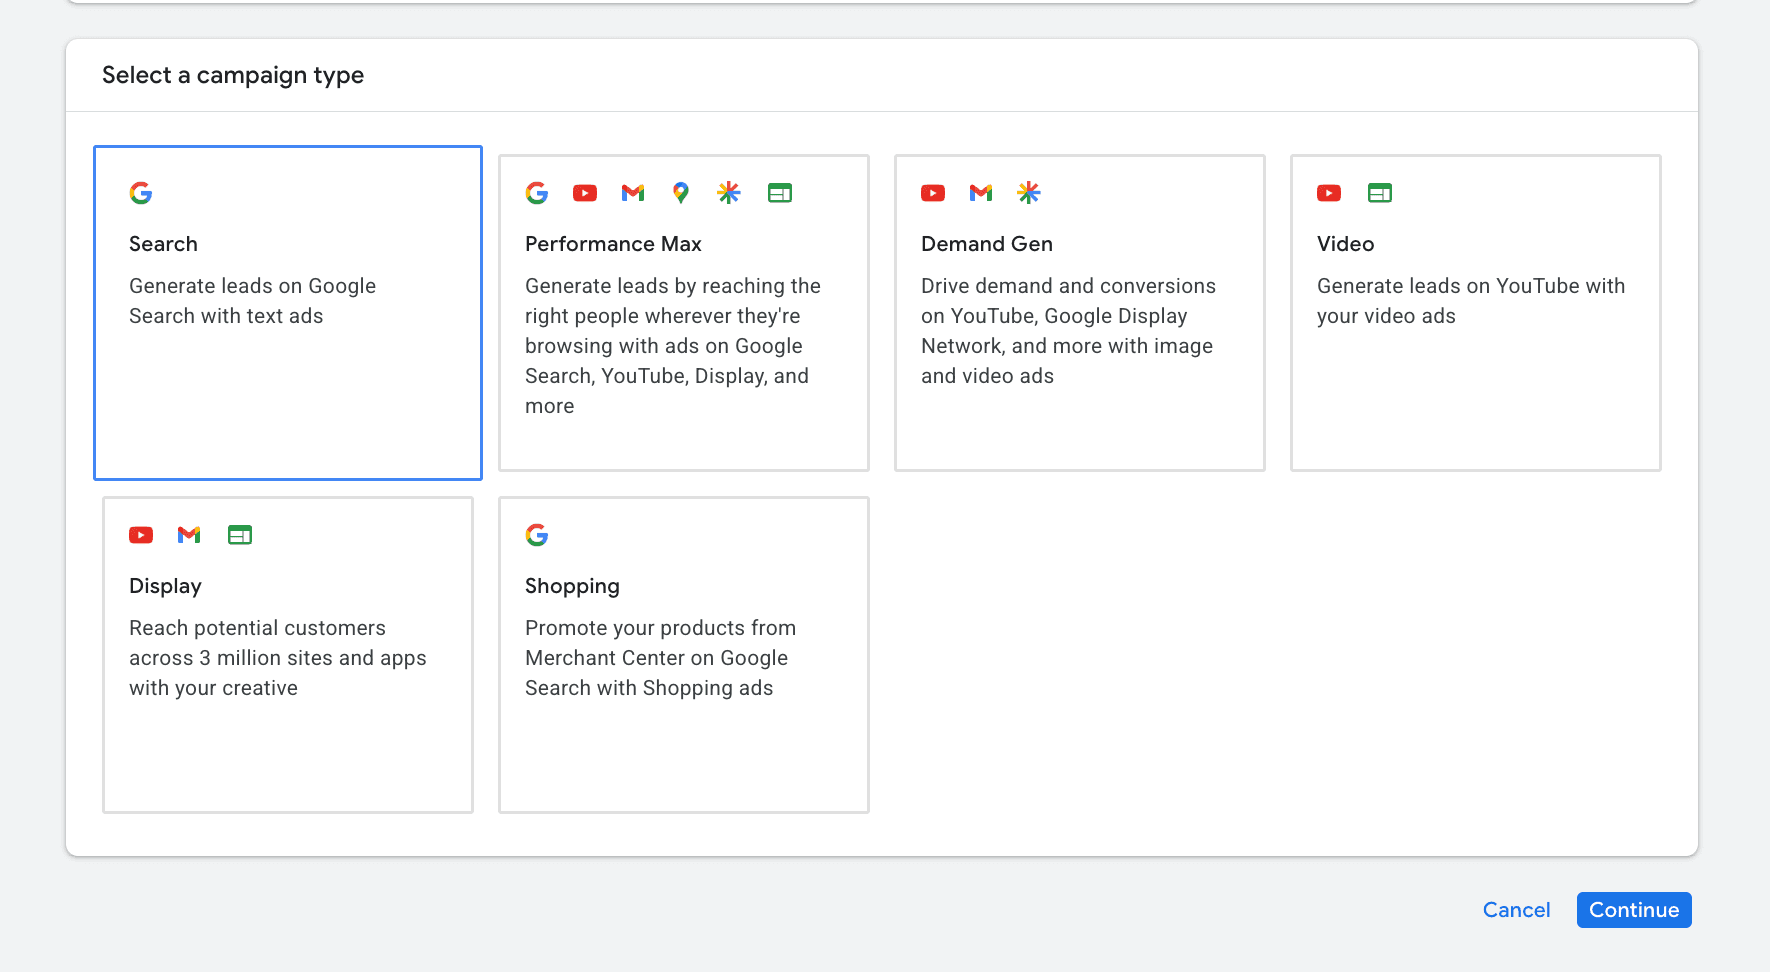
Select "Search Ads" Campaign
Next, Google will show you several campaign types: Search, Performance Max, Display, Video, and others.
Choose Search.
Search ads show up when someone actively types a query into Google. That's high-intent traffic where prospects are doing research or in the market looking for a contractor. Performance Max and Display can work, but Search is the foundation for service businesses.
Set Goals & Name Your Contractor Campaign
After selecting search, Google will ask you again which actions will count towards your goal. You can select multiple, but it won’t be needed as the only ones we care about are phone calls and lead form submissions.
Note: You do not have to select any of the options if you already setup conversions and set them up to your campaign.
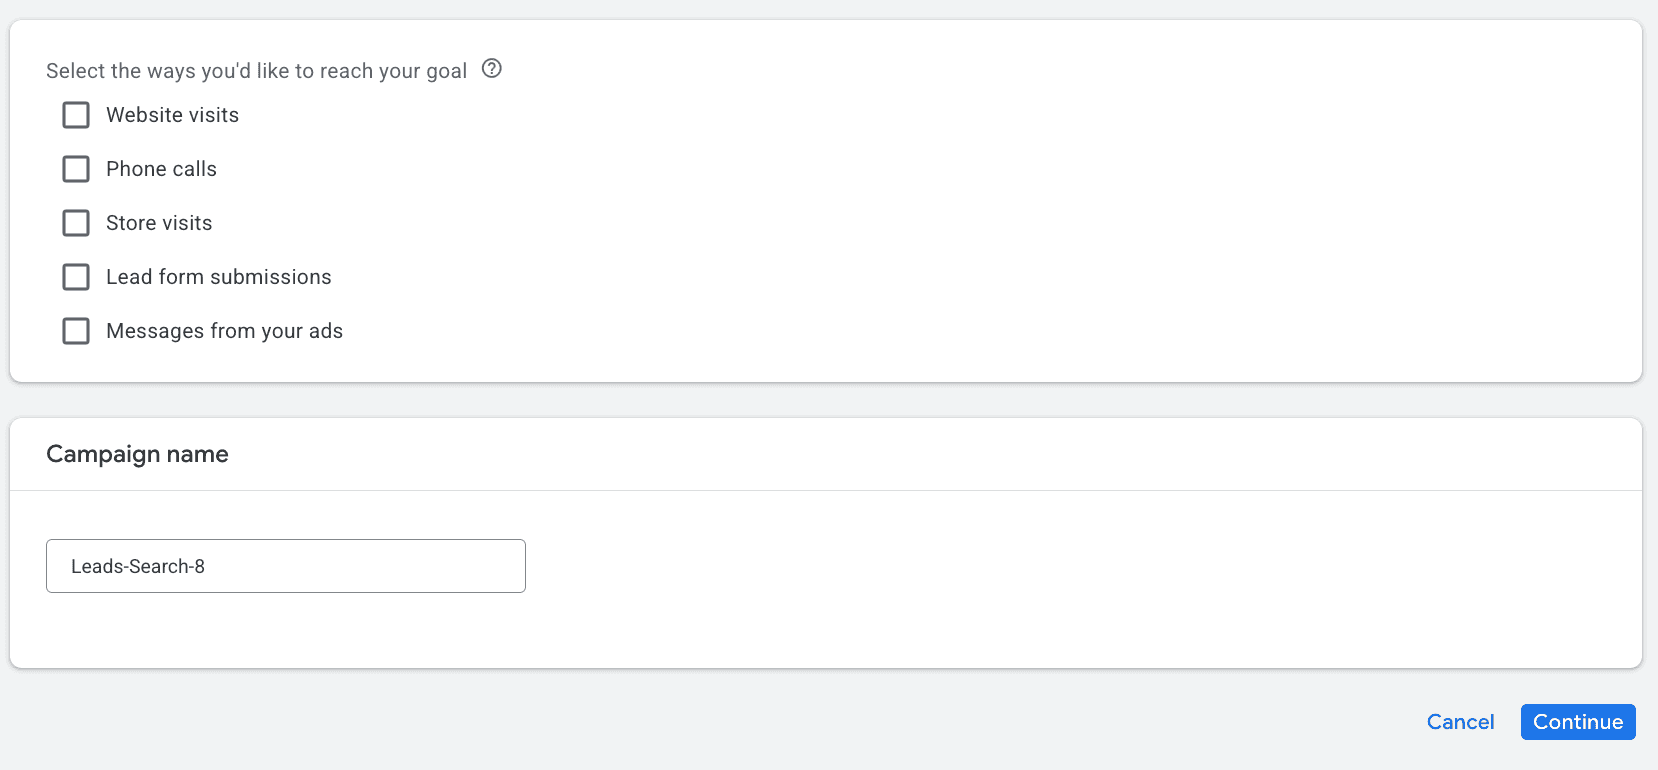
At the bottom you will be prompt to provide a name for your campaign. This may seem like something trivial, keep in mind a few things:
Be specific. A name like "Roofing Leads – Dallas – Search" tells you exactly what the campaign does at a glance. You'll thank yourself later when you're reviewing performance.
Think ahead to your ad groups. If you know you'll have separate ad groups for "roof repair," "roof replacement," and "emergency roofing," your campaign name should reflect the umbrella theme—something like "Roofing Services – Dallas."
Use a simple naming formula. If you're unsure where to start, try: [Service or Goal] – [Location] – [Campaign Type]. For example: "HVAC Leads – Houston – Search" or "Kitchen Remodel – Austin – Search."
The goal is to make your account easy to navigate. Especially as you add more campaigns over time.
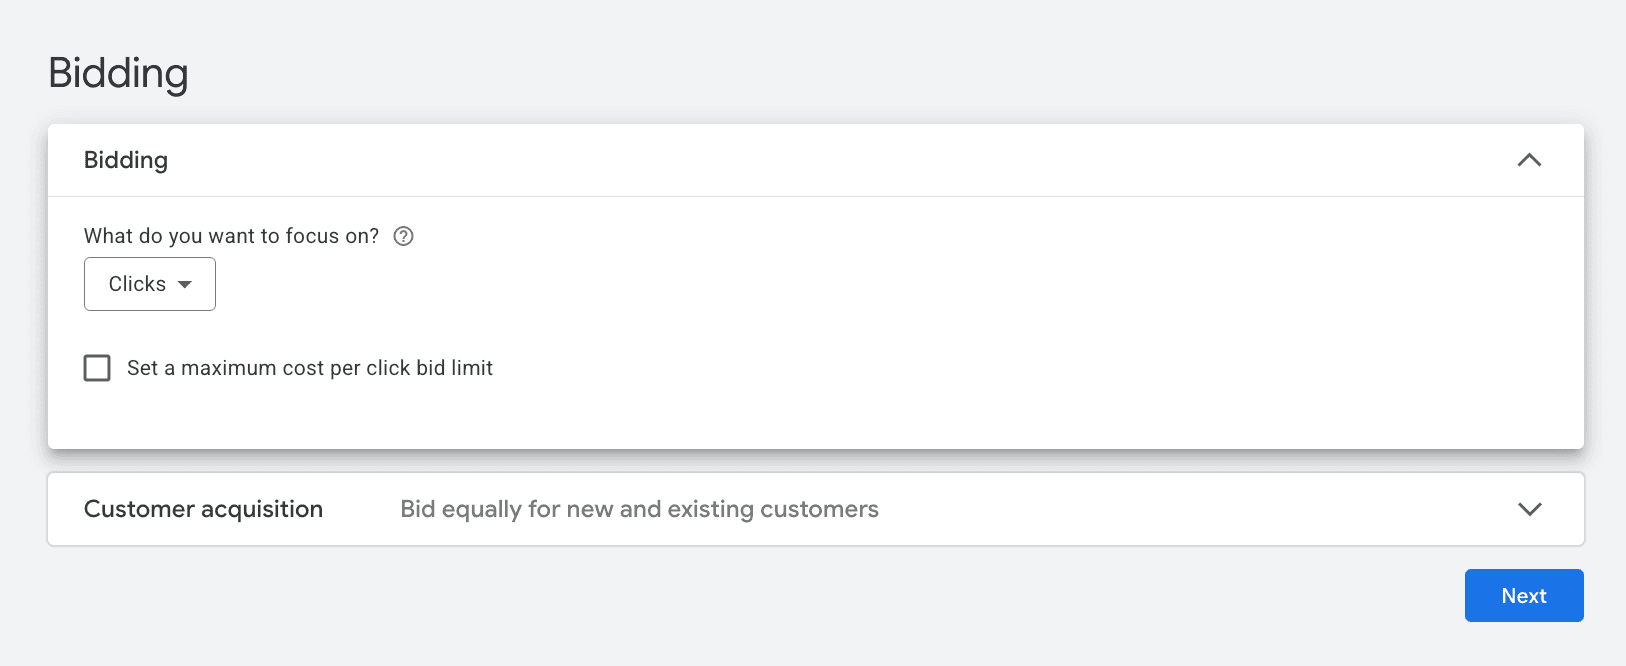
Determine Your Bid & Bidding Strategy
Your budget determines how much you'll spend in total. Your bid strategy tells Google how to spend that budget—and how much you're willing to pay for each individual action.
Google will suggest a bidding strategy based on your campaign objective and settings. You can go with the default or choose your own. Here's the progression we recommend:
1. Start with Maximize Clicks
Select "Clicks" as your focus. This tells Google to get as many clicks as possible within your daily budget. Why start here? Because you need data. A new campaign has no conversion history, so Maximize Clicks gets traffic flowing while you learn what's working.
You can also set a maximum cost-per-click bid limit if you're on a tight budget—just don't set it so low that it limits your visibility.
2. Switch to Conversions once you have data
After a few weeks and some conversions under your belt, switch your focus to "Conversions." This tells Google to optimize for getting as many conversions as possible within your budget. Let it run without a cost constraint while you build more data.
3. Add a Target CPA after 15–30+ conversions
Once you have enough conversion history, add a Target CPA (cost per acquisition) to tell Google the average amount you're willing to pay per lead. Set this based on your actual cost-per-conversion data—not wishful thinking. Adjust gradually (10-20% at a time) and give the system a couple weeks to adapt.
Contractor tip: Don't jump straight to Maximize Conversions or set a Target CPA on day one. Without conversion data, Google's algorithm will burn through your budget fast with little to show for it.
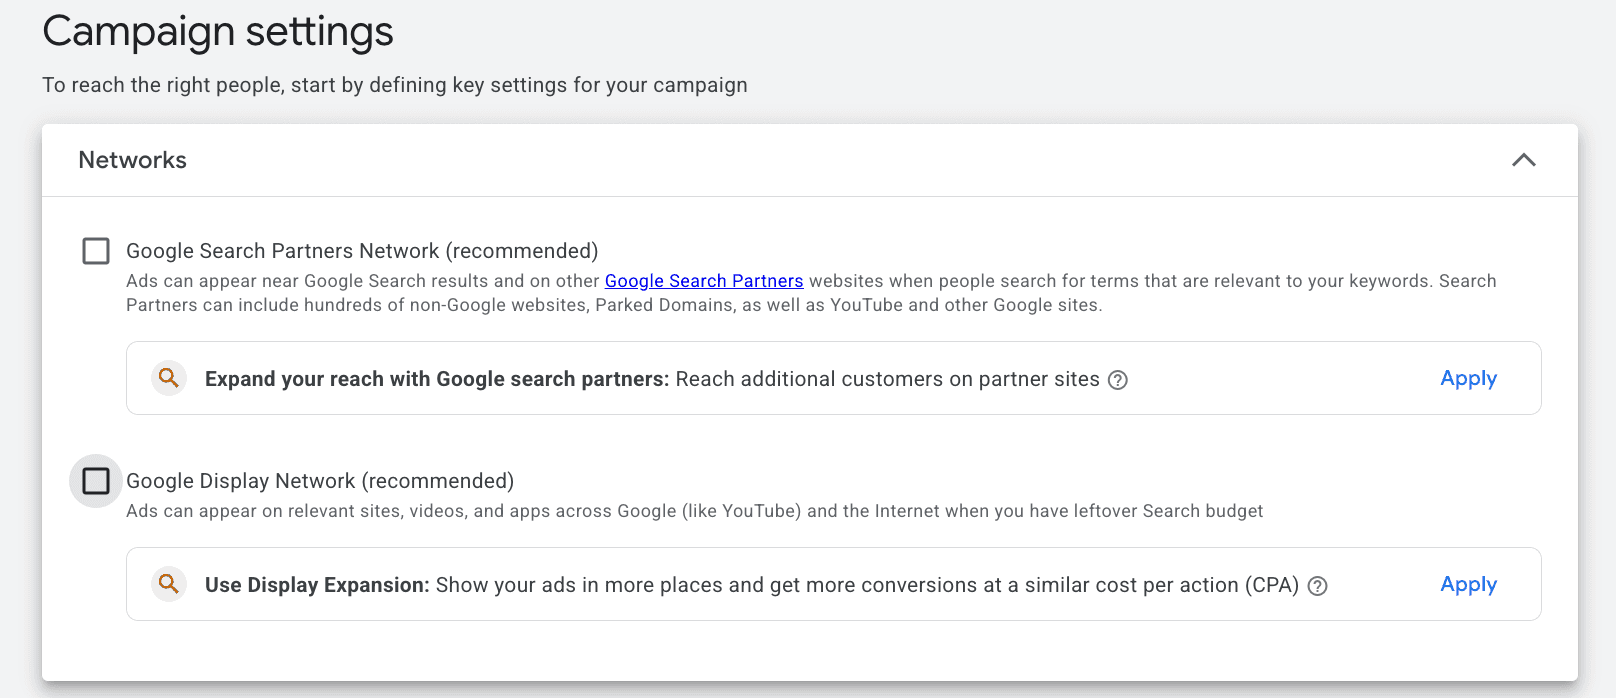
After setting your bid strategy, you'll move into Campaign Settings. This is where you define where your ads appear, who sees them, and how Google targets your audience.
Let's walk through each section.
Network Settings
Google will ask where you want your ads to show. You'll see two options—and both will be checked by default:
Search Network (Include Google search partners)
Display Network (Include Google Display Network)
Search Network – Google Search Partners
When this is checked, your ads can appear on other search engines and websites that partner with Google—like Yahoo, AOL, and various smaller search sites. The problem is you have very little visibility into which partner sites are showing your ads, and traffic quality from these sources is often lower than Google Search itself.
Our recommendation: Uncheck this. Keep your ads running on Google Search only.
Display Network
The Display Network places your ads on third-party websites—news sites, blogs, apps, and more. These are banner-style ads people see while browsing, not actively searching for a contractor. Click-through rates are lower, and leads are typically much colder.
Our recommendation: Uncheck this too. If you want to test Display later, run it as a separate campaign.
Contractor tip: Google checks both options by default because it expands their ad inventory—and your spend. For a new campaign, you want maximum control. Stick to Google Search only and experiment with these later once you're seeing consistent results.
Locations
This is where you define your service area—and it's one of the most important settings for contractors.
You can target by:
City or town
County or region
Zip codes
A radius around a specific address
Choose the option that best matches where you actually work. If you only serve a 30-mile radius around your shop, don't target the entire state.
Important setting: Click into "Location options" and change the targeting to "Presence: People in or regularly in your targeted locations."
The default—"Presence or interest"—shows your ads to people who are interested in your area but might not actually be there. That means you could pay for clicks from people three states away who were just researching your city. Not helpful when you need local jobs.

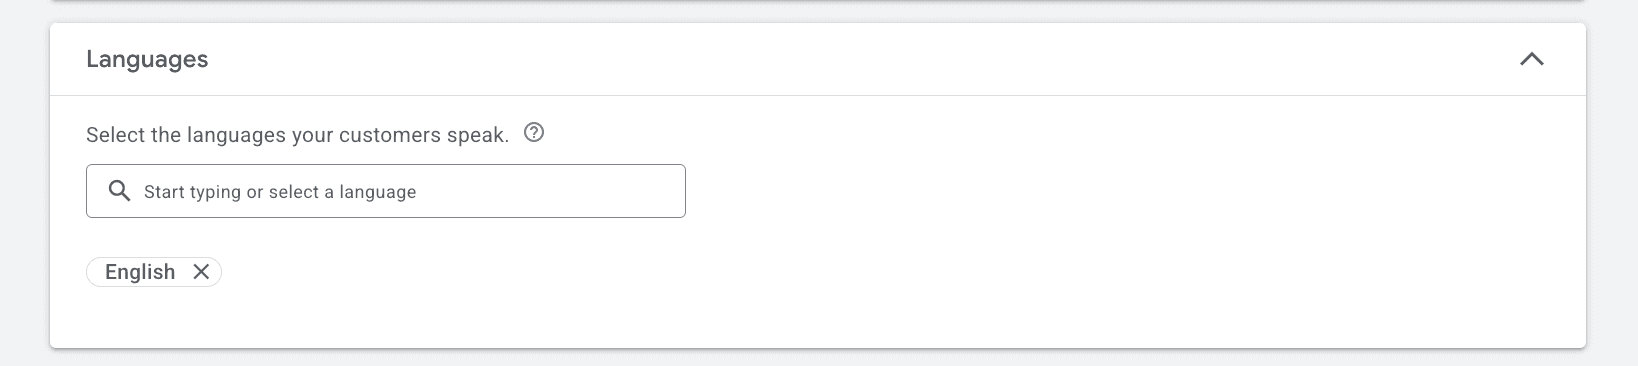
Languages
Set this to English—or add Spanish if you serve bilingual markets.
This setting tells Google to show your ads to users whose browser or Google account is set to that language. For most contractors, English is all you need.
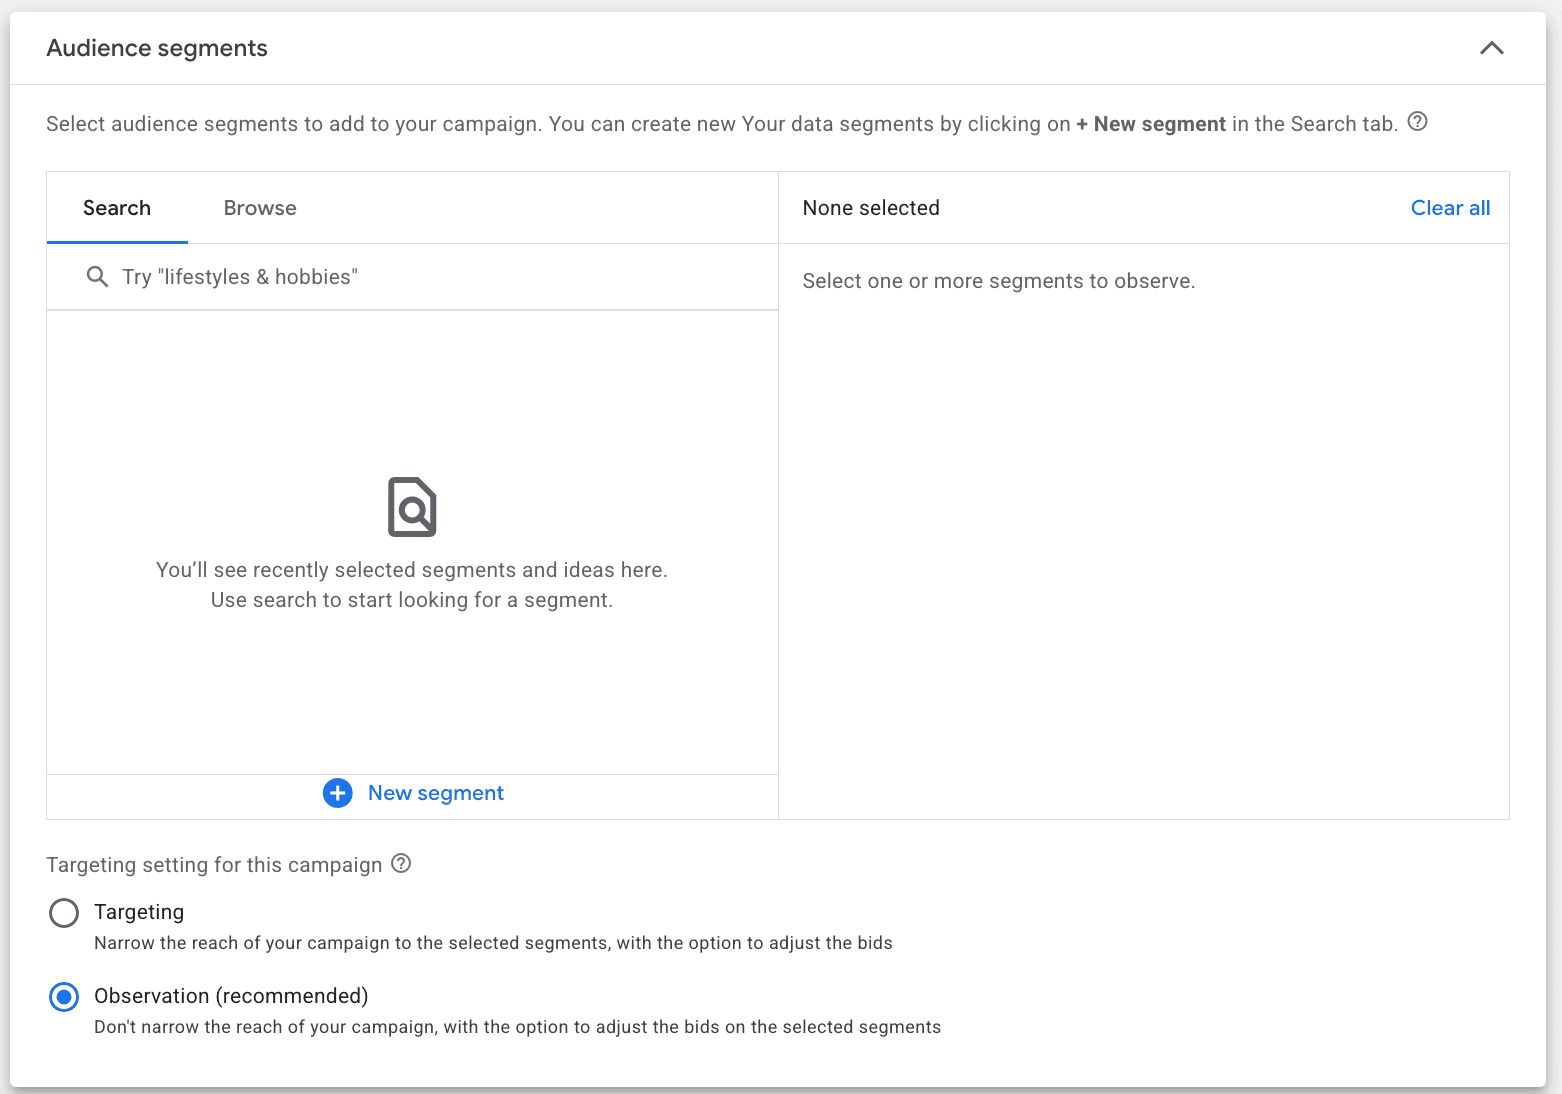
Audiences
You can add audience segments to your campaign based on interests, demographics, or behaviors. Google offers options like "Homeowners," "Home improvement enthusiasts," and similar categories.
For Search campaigns, set these to Observation mode—not Targeting.
Here's the difference:
Targeting = Your ads only show to people in that audience segment (limits your reach)
Observation = Your ads show to everyone, but you can see how specific audiences perform (no limits)
Observation mode lets you gather data on which audiences convert best without cutting off potential leads. You can always tighten targeting later once you know what's working.
Ad Rotation
Below Audience segments, you'll see Ad rotation settings. This tells Google how to handle multiple ads within an ad group.
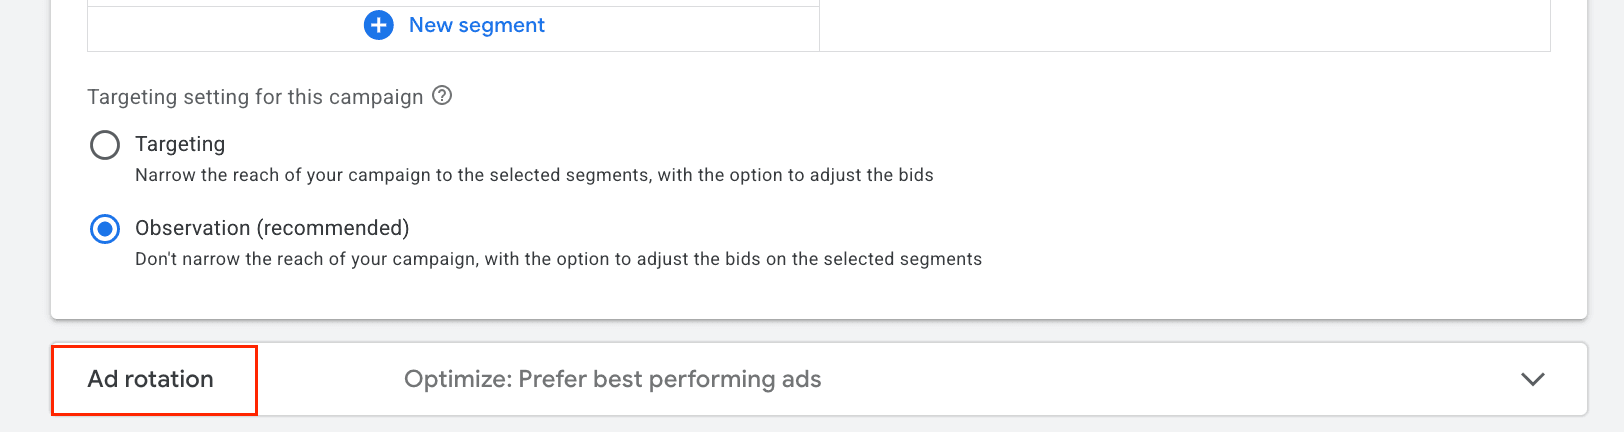
The default—Optimize: Prefer best performing ads—lets Google prioritize ads getting the most clicks and conversions. Over time, your best-performing ads get shown more often.

There are reasons to choose "Do not optimize" and rotate ads evenly—like when you're running a controlled A/B test and want equal exposure across variations. But for contractors launching a new campaign, the default setting works well. Let Google do the heavy lifting while you focus on getting leads.
Ad Scheduling & Day Parting
Also under "More Settings," you'll find options to control when your ads run.
Start and End Dates
You can set a start date and an optional end date for your campaign. If you don't set an end date, your ads will run continuously until you pause them manually.
For most contractors, leave the end date blank. You want a steady flow of leads, not a one-time burst. The exception would be seasonal promotions or limited-time offers where you want the campaign to stop automatically.
Ad Schedule
Ad scheduling (also called day parting) lets you choose specific days and times for your ads to run.
This matters for contractors. If you can't return calls quickly after hours, consider running ads only during business hours. A lead that calls at 9 PM and doesn't get a callback often moves on to the next contractor by morning.
On the other hand, if you have someone answering calls or a system to capture after-hours leads, running ads around the clock can work in your favor—less competition at night often means cheaper clicks.
Contractor tip: Be honest with yourself about your response time. If leads sit untouched until the next morning, tighten your schedule and save your budget for hours when you can pick up the phone.
A Note on AI Max and Keyword & Asset Generation
As you go through the setup, you'll notice sections for AI Max and Keyword and asset generation. These are newer features where Google uses AI to automatically generate keywords, headlines, and other assets for your campaign.
Our recommendation: Skip these for now.
If you're a contractor setting up your first campaign, you want full control over your keywords and ad copy. Letting Google auto-generate these can lead to irrelevant traffic and messaging that doesn't match your services.
Once you're more comfortable with Google Ads and have conversion data to work with, you can experiment with these features. But for now, keep things manual so you know exactly what's running and why.
Ad Groups
After Campaign Settings, you'll move into Ad Groups. This is where you define what searches trigger your ads and what people actually see.
Add Keywords
Before you start entering keywords, you should have your keyword research done ahead of time. Campaign setup isn't the moment to start guessing at search terms—you want a clear list ready to go.
If you haven't done keyword research yet, pause here and knock that out first. We've put together a guide specifically for contractors: Google Ads Keyword Research for Construction Firms.
Once you have your list, enter your keywords into the ad group. A few rules for contractors:
Use phrase match and exact match. Avoid broad match early on—it casts too wide a net and attracts irrelevant clicks. Phrase match (keywords in "quotes") and exact match (keywords in [brackets]) give you more control.
Focus on service + location intent. Think: "roof repair Dallas," "HVAC contractor near me," "licensed electrician Austin." These searches lead to real jobs.
Add negative keywords from day one. These are words you don't want triggering your ads. Common negatives for contractors:
DIY
jobs / hiring / salary
free
cheap
classes / training
This keeps your budget focused on people who want to hire—not job seekers or DIYers.

Create Your Ads
After you've set up your keywords, it's time to create the ads themselves.
Google requires multiple headlines and multiple descriptions. This isn't busywork—Google mixes and matches these to test different combinations and find what drives the most clicks and conversions. The more quality options you give it, the better it can optimize.
Headlines (up to 15):
You'll want to cover a few angles across your headlines:
Your service ("Roof Repair," "AC Installation," "Licensed Plumber")
Your location ("Serving Dallas," "Houston Area Contractor")
Trust signals ("Licensed & Insured," "Family-Owned Since 1998," "5-Star Rated")
Calls to action ("Get a Free Estimate," "Call Now," "Same-Day Service")
Keep in mind that headlines can appear in any order, so make sure each one makes sense on its own. Don't write headlines that depend on another headline to be understood.
Descriptions (up to 4):
Descriptions give you more room to explain your services and why someone should choose you. Cover:
What you do and who you serve
What sets you apart from competitors
A clear next step ("Call today for a free quote")
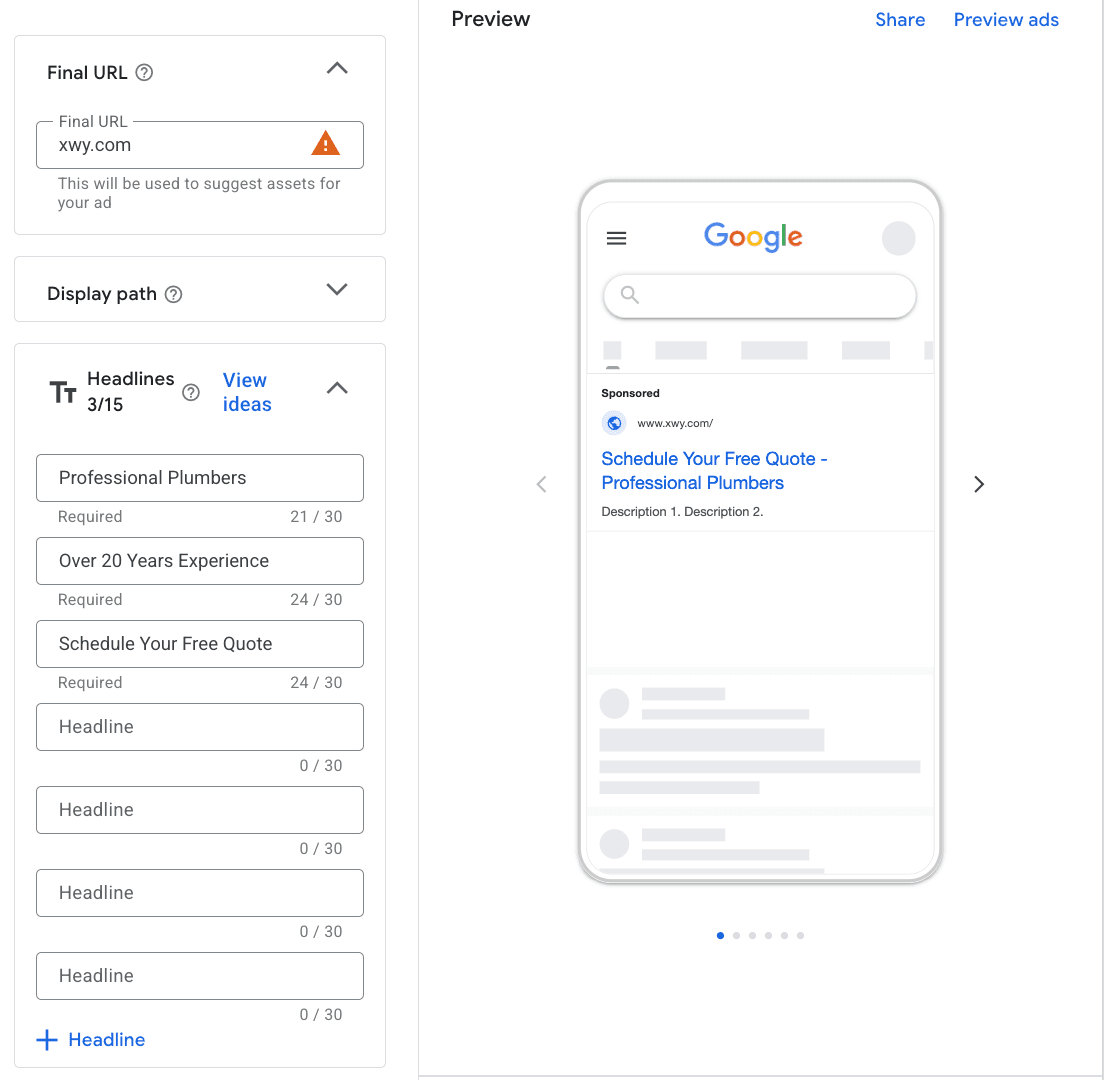
Use the preview panel. As you write, Google shows you a preview of how your ad might appear. Look for awkward phrasing, repeated words, or missed opportunities to include keywords. Reading your ad out loud helps catch things that look fine but sound off.
Advanced features (optional):
Google also offers dynamic features you can add to your headlines and descriptions:
Dynamic keyword insertion – Automatically inserts the keyword that triggered your ad
Countdown timers – Adds urgency for limited-time offers
Location insertion – Automatically inserts the user's city or region
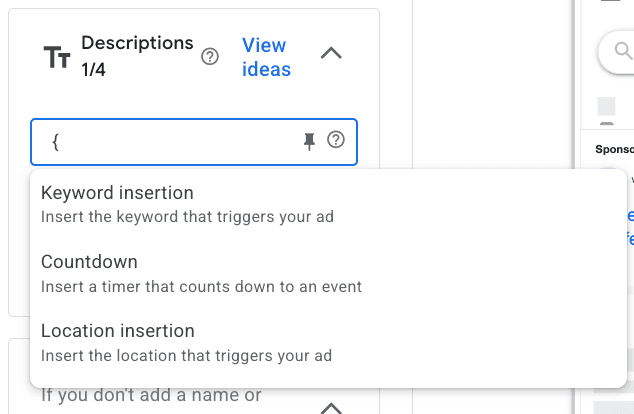
These can be useful, but they're not required. For contractors just getting started, focus on writing solid, clear ad copy first. You can experiment with dynamic features later.
Add Extensions (Assets)
Before you submit your campaign, you'll have the option to add extensions—now called "assets" in Google Ads.
Extensions add extra information to your ads at no additional cost. They make your ad larger, give people more ways to engage, and often improve click-through rates. Google chooses when to show extensions based on what it thinks will perform best, so your job is to give it plenty of options.
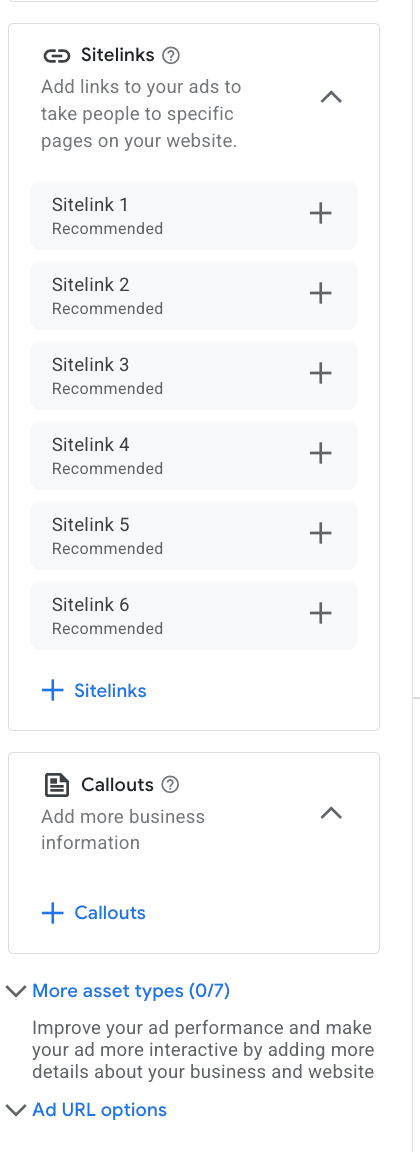
For contractors, these are the most valuable:
Call extension – Adds a clickable phone number directly in your ad. For contractors, this is critical. Many people searching for a service want to call right away, and this lets them do it without even visiting your website.
Sitelink extensions – These are additional links that appear below your ad, pointing to specific pages on your site. Use them to highlight your Services page, About Us, Contact, or specific offerings like "Emergency Repairs" or "Free Estimates."
Callout extensions – Short, non-clickable phrases that highlight key selling points. Think: "24/7 Emergency Service," "Locally Owned," "No Hidden Fees," "Serving [City] Since 2005."
Location extension – Displays your business address and helps people find you. This requires linking your Google Business Profile to your Ads account. If you serve a local area, this adds credibility and makes your ad more relevant.
Lead form extension – Lets users submit their contact info directly from the ad without visiting your website. This can lower friction, but make sure you have a system to follow up on these leads quickly.
Our recommendation: Add as many relevant extensions as you can. The more options Google has to work with, the more ways your ad can stand out. Extensions are free to add—you only pay when someone clicks.
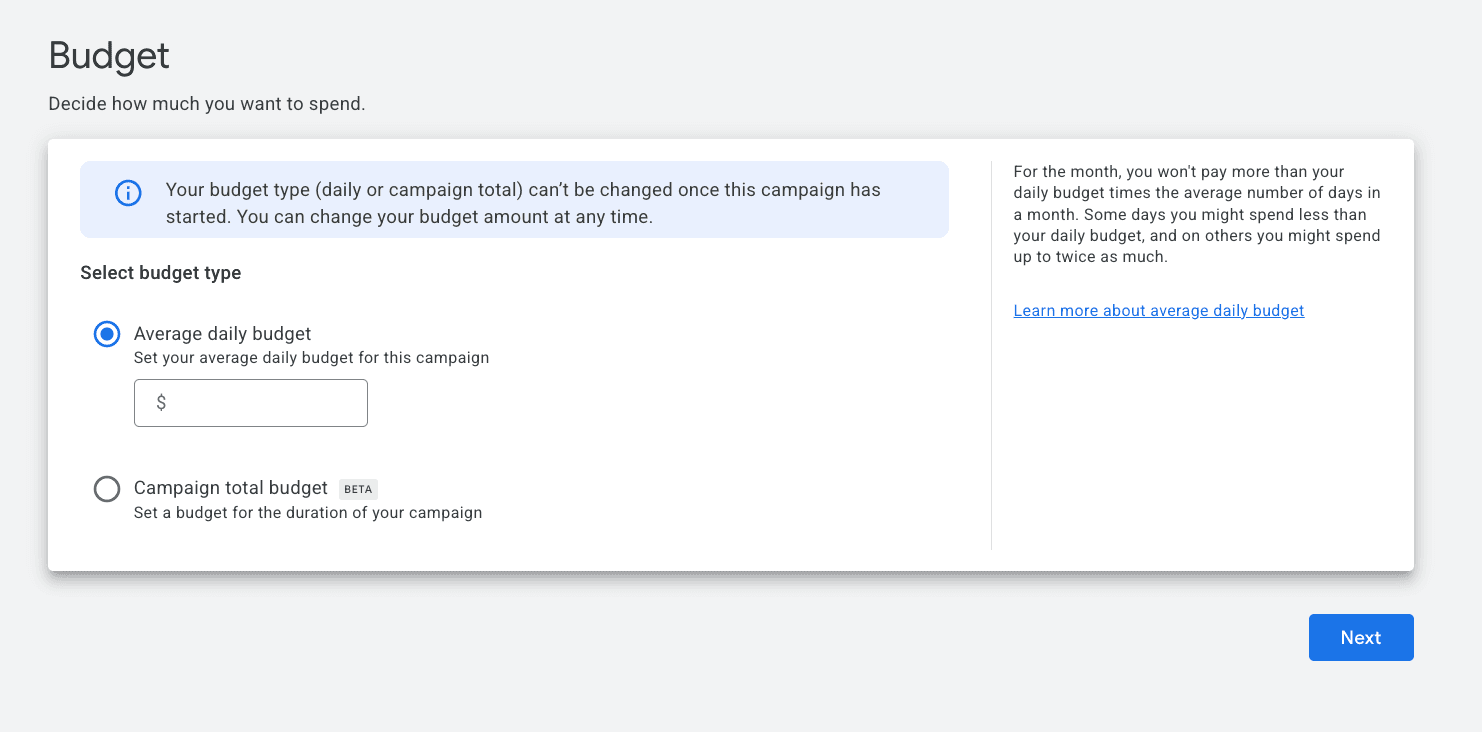
Determine Your Budget
After finishing your ad groups, you'll set your daily budget. This tells Google the average amount you want to spend per day on this campaign.
It's a daily average, not a hard cap.
Google may spend more on some days and less on others depending on search traffic. But over a month, your total spend won't exceed your daily budget multiplied by 30.4. So a $50/day budget means up to around $1,520/month.
Start with what you're comfortable testing.
For most local contractors, $30–$50/day is enough to get meaningful traffic while you figure out what's working. Going too low limits your data and slows down learning. Going too high before you know what works just burns money.
Contractor tip: Think about what a new job is worth to you. If your average project is $5,000 and you close 1 in 5 leads, you can afford to spend more to get those leads. Back into a budget that makes sense for your business—not just what feels comfortable.
Review Everything
Before you hit publish, double-check:
Budget (make sure you didn't add an extra zero)
Location targeting (Presence only, not Presence or Interest)
Keywords and negatives
Ad copy for typos & proper grammar.
Then submit! Google typically reviews and approves ads within one business day.
How to Edit Your Campaigns
Click into the campaign, then to the right of the ad group dropdown, click "Campaign settings." From there, you can update your budget, locations, bidding strategy, ad schedule, and other settings.

To edit your ads, keywords, or extensions, use the left-hand navigation menu and select the section you need—or use the ad group dropdown to access specific ad groups.
Final Thoughts
Google Ads isn't plug-and-play—but it's not rocket science either.
The difference between burning money and booking jobs comes down to a few contractor-specific settings: controlling where your ads appear, tightening your location targeting, choosing the right bid strategy for your stage, and adding negative keywords from day one.
Get those right, and you'll have a lead generation system that doesn't depend on referrals or luck.
The key is to start, gather data, and improve as you go. Your first campaign won't be perfect—and it doesn't need to be. What matters is getting it live, watching what happens, and making adjustments based on real numbers.
Want help setting up or managing your Google Ads the right way? Book a free consultation and we'll show you where the opportunities are.
Get Weekly Marketing Tips
Join other AEC professionals to get the best marketing tips every week in your inbox


